To be sure, manually authoring XAML that represents a complex set of geometries, segments, figures, and paths would be a nightmare, and nobody would expect us to do so. As we have already seen, Expression Blend does contain a few IDE features that allow us to work with basic graphics; however when you need to generate professional, compelling vector graphics, Expression Design is the tool of champions.
Note If you do not have a copy of Expression Design, you can download a trial edition of the product from the official web site: http://www.microsoft.com/expression.
Expression Design has features similar to those you might find in a professional graphical design tool such as Adobe Photoshop or Adobe Illustrator. In the hands of a talented graphical artist, Design can be used to create very sophisticated 2D and 3D images, which can be exported in a variety of file formats—including XAML!
The ability to export a graphical image as XAML is very compelling, in that we (as programmers) can incorporate the markup into our applications, name objects, and manipulate them in code. For example, a graphical artist could use Design to create a 3D cube image. Once the image is exported to XAML, we could add the x:Name attribute to the items we wish to interact with, and gain access to the generated object in our C# codebase.
Now, in the spirit of full disclosure, I must admit that I am in no way, shape, or form, a graphical artist. Therefore, I am not going to walk through using Expression Design to render complex graphical data; rather we will view and manipulate some standard sample documents that ship with the product.
To begin, launch Expression Design and activate the Help > Samples menu selection. In the resulting dialog box, double-click one of the sample drawings. For this example, I’ll assume you clicked the bear_paper.design file that ships with Expression Design 3.0.
Now, select the File > Export menu option. Here you will find a dialog box that allows you to save the selected image data to a variety of common file formats, including .png, .jpeg, .gif, .tif, .bmp and .wdp (for HD photos). If you use Design simply to make professional static images, these file formats should fit the bill. However, if you want to add interactivity to your vector art, you can save the file in a XAML description.
Select XAML WPF Canvas from the Format drop-down list in the Export dialog box. Notice the other options in Figure 29-20, including the ability to give each item a default name (via the x:Name attribute) and to save any text data as a Path object. You can leave the default settings, but be sure to save the XAML file to an easily found location and then click the Export All button.
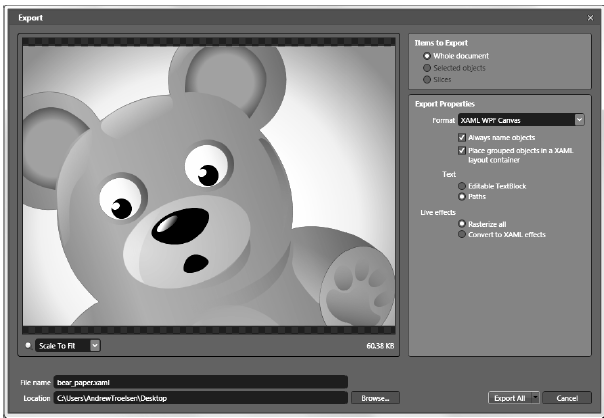
Figure 29-20 Expression Design files can be exported as XAML
At this point, you can copy the generated XAML Canvas object into any Visual Studio 2010 or Expression Blend WPF application. Or, for an even easier test, you could copy the generated markup into a <Page> or <Window> scope within the kaxaml editor (or the custom XAML editor you created in Chapter 27).
In any case, if you view the generated XAML, you’ll see that Path objects are the default format. At this point, you can handle events on the parts of the image you wish to manipulate, and author the related C# code. While I won’t walk you through the process (you should already be in pretty good shape by this point in the chapter), you might want to import the “teddy bear” data into a new WPF application and see if you can handle the MouseDown event for one of eyeball objects. In the event handler, try to apply a transformation object or change the color (I have to admit I did make my bear’s eye blood-red when clicked upon…).
Note We will not use Expression Design anymore in this book. If you’re interested in the product, however, Design ships with its own dedicated help system, which can be activated via the F1 key.